In this tutorial, we will show you how to integrate Spring Security with a Spring MVC web application to secure a URL access. After implementing Spring Security, to access the content of an “admin” page, users need to key in the correct “username” and “password”.
Technologies used :
- Spring 3.2.8.RELEASE
- Spring Security 3.2.3.RELEASE
- Eclipse 4.2
- JDK 1.6
- Maven 3
Spring Security 3.0 requires Java 5.0 Runtime Environment or higher
1. Project Demo
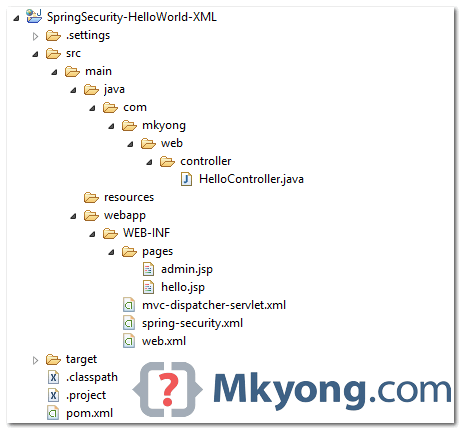
2. Directory Structure
Review the final directory structure of this tutorial.
3. Spring Security Dependencies
To use Spring security, you need spring-security-web and spring-security-config.
	<properties>
		<jdk.version>1.6</jdk.version>
		<spring.version>3.2.8.RELEASE</spring.version>
		<spring.security.version>3.2.3.RELEASE</spring.security.version>
		<jstl.version>1.2</jstl.version>
	</properties>

	<dependencies>

		<!-- Spring dependencies -->
		<dependency>
			<groupId>org.springframework</groupId>
			<artifactId>spring-core</artifactId>
			<version>${spring.version}</version>
		</dependency>

		<dependency>
			<groupId>org.springframework</groupId>
			<artifactId>spring-web</artifactId>
			<version>${spring.version}</version>
		</dependency>

		<dependency>
			<groupId>org.springframework</groupId>
			<artifactId>spring-webmvc</artifactId>
			<version>${spring.version}</version>
		</dependency>

		<!-- Spring Security -->
		<dependency>
			<groupId>org.springframework.security</groupId>
			<artifactId>spring-security-web</artifactId>
			<version>${spring.security.version}</version>
		</dependency>

		<dependency>
			<groupId>org.springframework.security</groupId>
			<artifactId>spring-security-config</artifactId>
			<version>${spring.security.version}</version>
		</dependency>

		<!-- jstl for jsp page -->
		<dependency>
			<groupId>jstl</groupId>
			<artifactId>jstl</artifactId>
			<version>${jstl.version}</version>
		</dependency>

	</dependencies>
4. Spring MVC Web Application
A simple controller :
- If URL =
/welcomeor/, return hello page. - If URL =
/admin, return admin page.
Later, we will show you how to use Spring Security to secure the “/admin” URL with a user login form.
package com.mkyong.web.controller;

import org.springframework.stereotype.Controller;
import org.springframework.web.bind.annotation.RequestMapping;
import org.springframework.web.bind.annotation.RequestMethod;
import org.springframework.web.servlet.ModelAndView;

@Controller
public class HelloController {

	@RequestMapping(value = { "/", "/welcome**" }, method = RequestMethod.GET)
	public ModelAndView welcomePage() {

		ModelAndView model = new ModelAndView();
		model.addObject("title", "Spring Security Hello World");
		model.addObject("message", "This is welcome page!");
		model.setViewName("hello");
		return model;

	}

	@RequestMapping(value = "/admin**", method = RequestMethod.GET)
	public ModelAndView adminPage() {

		ModelAndView model = new ModelAndView();
		model.addObject("title", "Spring Security Hello World");
		model.addObject("message", "This is protected page!");
		model.setViewName("admin");

		return model;

	}

}
Two JSP pages.
<%@page session="false"%>
<html>
<body>
	<h1>Title : ${title}</h1>
	<h1>Message : ${message}</h1>
</body>
</html>
<%@taglib prefix="c" uri="http://java.sun.com/jsp/jstl/core"%>
<%@page session="true"%>
<html>
<body>
	<h1>Title : ${title}</h1>
	<h1>Message : ${message}</h1>

	<c:if test="${pageContext.request.userPrincipal.name != null}">
	   <h2>Welcome : ${pageContext.request.userPrincipal.name}
           | <a href="<c:url value="/j_spring_security_logout" />" > Logout</a></h2>
	</c:if>
</body>
</html>
<beans xmlns="http://www.springframework.org/schema/beans"
	xmlns:context="http://www.springframework.org/schema/context"
	xmlns:xsi="http://www.w3.org/2001/XMLSchema-instance"
	xsi:schemaLocation="
        http://www.springframework.org/schema/beans
        http://www.springframework.org/schema/beans/spring-beans-3.0.xsd
        http://www.springframework.org/schema/context
        http://www.springframework.org/schema/context/spring-context-3.0.xsd">

	<context:component-scan base-package="com.mkyong.*" />

	<bean
	  class="org.springframework.web.servlet.view.InternalResourceViewResolver">
	  <property name="prefix">
		<value>/WEB-INF/pages/</value>
	  </property>
	  <property name="suffix">
		<value>.jsp</value>
	  </property>
	</bean>

</beans>
5. Spring Security : User Authentication
Create a Spring Security XML file.
<beans:beans xmlns="http://www.springframework.org/schema/security"
	xmlns:beans="http://www.springframework.org/schema/beans"
	xmlns:xsi="http://www.w3.org/2001/XMLSchema-instance"
	xsi:schemaLocation="http://www.springframework.org/schema/beans
	http://www.springframework.org/schema/beans/spring-beans-3.0.xsd
	http://www.springframework.org/schema/security
	http://www.springframework.org/schema/security/spring-security-3.2.xsd">

	<http auto-config="true">
		<intercept-url pattern="/admin**" access="ROLE_USER" />
	</http>

	<authentication-manager>
	  <authentication-provider>
	    <user-service>
		<user name="mkyong" password="123456" authorities="ROLE_USER" />
	    </user-service>
	  </authentication-provider>
	</authentication-manager>

</beans:beans>
It tells, only user “mkyong” is allowed to access the /admin URL.
6. Integrate Spring Security
To integrate Spring security with a Spring MVC web application, just declares DelegatingFilterProxy as a servlet filter to intercept any incoming request.
<web-app id="WebApp_ID" version="2.4"
	xmlns="http://java.sun.com/xml/ns/j2ee"
	xmlns:xsi="http://www.w3.org/2001/XMLSchema-instance"
	xsi:schemaLocation="http://java.sun.com/xml/ns/j2ee
	http://java.sun.com/xml/ns/j2ee/web-app_2_4.xsd">

	<display-name>Spring MVC Application</display-name>

	<!-- Spring MVC -->
	<servlet>
		<servlet-name>mvc-dispatcher</servlet-name>
		<servlet-class>org.springframework.web.servlet.DispatcherServlet
		</servlet-class>
		<load-on-startup>1</load-on-startup>
	</servlet>
	<servlet-mapping>
		<servlet-name>mvc-dispatcher</servlet-name>
		<url-pattern>/</url-pattern>
	</servlet-mapping>

	<listener>
		<listener-class>org.springframework.web.context.ContextLoaderListener
		</listener-class>
	</listener>

        <!-- Loads Spring Security config file -->
	<context-param>
		<param-name>contextConfigLocation</param-name>
		<param-value>
			/WEB-INF/spring-security.xml
		</param-value>
	</context-param>

	<!-- Spring Security -->
	<filter>
		<filter-name>springSecurityFilterChain</filter-name>
		<filter-class>org.springframework.web.filter.DelegatingFilterProxy
		</filter-class>
	</filter>

	<filter-mapping>
		<filter-name>springSecurityFilterChain</filter-name>
		<url-pattern>/*</url-pattern>
	</filter-mapping>

</web-app>
7. Demo
That’s all, but wait… where’s the login form? No worry, if you do not define any custom login form, Spring will create a simple login form automatically.
Read this “Spring Security form login example” to understand how to create a custom login form in Spring Security.
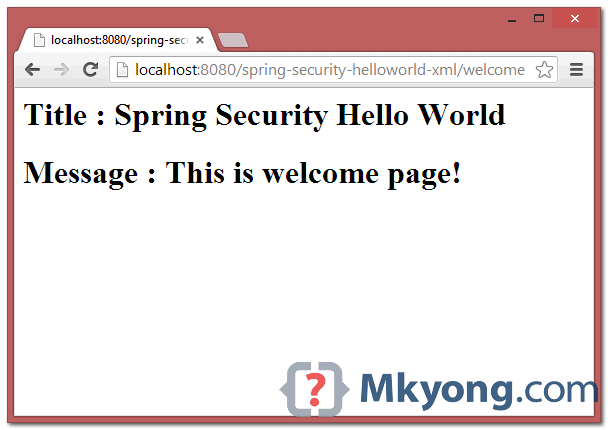
1. Welcome Page – http://localhost:8080/spring-security-helloworld-xml/welcome
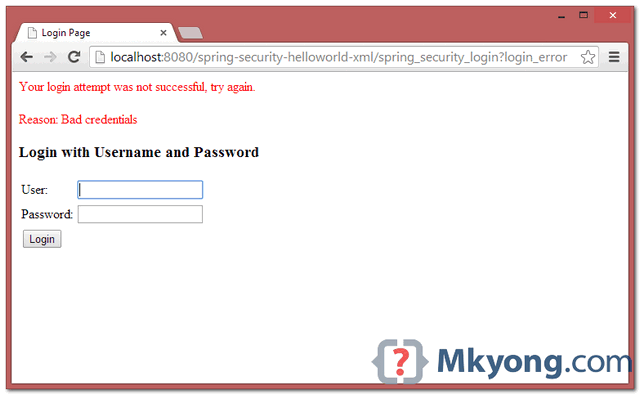
2. Try to access /admin page, Spring Security will intercept the request and redirect to /spring_security_login, and a predefined login form is displayed.

3. If username and password is incorrect, error messages will be displayed, and Spring will redirect to this URL /spring_security_login?login_error.
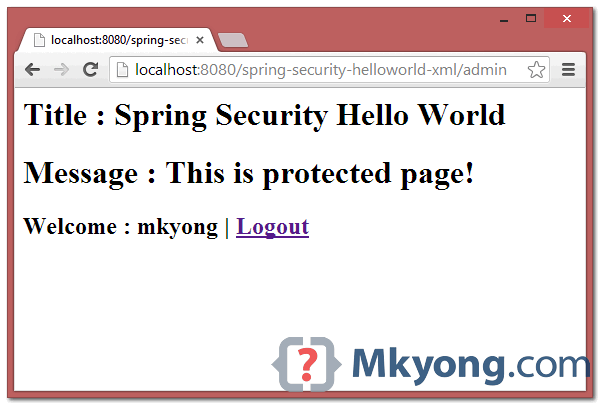
4. If username and password are correct, Spring will redirect the request to the original requested URL and display the page.
For a basic token based authentication use the below, This is based on Spring 3.1
Your configuration is flawed, you are duplicating bean instances. Both the ContextLoaderListener and DispatcherServlet load the ‘/WEB-INF/mvc-dispatcher-servlet.xml’ configuration. Which basically leads to scanning the classpath twice, 2 InternalViewResolvers etc.
In this case it doesn’t lead to problems but for larger projects it will lead to problems.
Thanks, article is updated.
Hi Martin,
Can you explain a bit more on the issue, you mentioned above ? and what is the solution for that ?
Hello.
First of all I have to say thank you for yours great tutorials and complete explanations for them. Most of my recent experience with modern JAVA technologies and frameworks received from this blog.
But now I got a trouble trying to use Spring Security with Spring MVC aplication. The issue is with new versions of Spring/Spring Security. I am using Spring framework version 4.1.6.RELEASE and trying to add Security version 4.1.0.RC1. And they are conflicting wtih each other, It says that no servlet alowed together in conjunction with org.springframework.web.context.ContextLoaderListener.
Your tutorial works fine, but it is with versions 3.2.8 and 3.2.3 respectively. So my question is it possible to renew entire Security tutorial (hello world for example) or maybe some migration guide from 3 version to 4?
whats name the folder with files xml ?
Webapp –> WEB – INF ?
hi,when download the source code,it give No bean named ‘springSecurityFilterChain’ is defined ,can you help me
Some issues while execution:
– url http://localhost:8080/SpringMVC/welcome doesn’t automatically redirect to /welcome after authentication. It becomes http://localhost:8080/SpringSecuritySetup/;jsessionid=D8669208493AFDE7D9E113FEDCB554CF where I need to insert /welcome manually, then it shows next page!!! Why so?
– Since this project is using old jars, I updated to 3.2.3 and spring-security jars to 3.1 Then it didn’t work. Login page came but authentication never succeed even after providing correct credentials. You can see the complete post here:
http://www.coderanch.com/t/618591/Spring/Spring-security-sample-working
Waiting for the reply. Thanks.
Please ignore the context root ‘SpringSecuritySetup’ as I renamed the project.
Thanks for this tutorial
Can you give us examples of using annotations in spring security i.e. @secured @preauthorize etc
if you add the / at the end of the url… i.e “http://localhost:8080/SpringMVC/welcome/” …. I don’t get the login form instead it shows the hell.jsp which is protected resource.
I am also facing same problem
The demo video is excelent! Congrats!
Hello everyone
The app run correctly see your local url ‘http://localhost:8080/SpringSecurityHelloWorld/welcome’.
I can not validate the user input and password I systematically “Bad credentials”
Can this come from the Tomcat configuration? because I rigorously followed the example.
Thank you for your reply
When I follow this example and try to hit webservice in my application, I am getting 401 unauthorized. When i pass basic authorization, I dont want to validate header in spring layer but want to send authorization header to backend. Can you suggest me for this scenario?
Hi MKYong,
I just added your code in my eclipse but I am getting the security violation here because when i tried with this URL: http://localhost:8080/SpringSecurityXMLDemo/admin/
I am able to see the admin page without login attempts. It’s working fine with this URL: http://localhost:8080/SpringSecurityXMLDemo/admin
Please suggest if anything wrong.
After logout if i click browser back button then it is again taking me to restricted admin page due to cache i think even if i know that session has been invalidated and if i refresh the same url after clicking back button it is taking me to log in page . So i understand but can someone tell me how to force browser not to take me to restricted page after log out if i click back button ? if no-cache, no-pragma have to be used then describe or is there any other proper way to handle the issue? please don’t suggest me to disable browser back button through js code, can mkyoung or anybody please answer ?
I am getting 403 error on login button submit.
It is also not showing bad credential or anything, direct error on login button press.
Am using spring security 4.1.0.
Any help will be great 🙂
Hi mkyong,
Thanks for the tutorial.
Hi mkyong, congratulations for the site, i find it very useful.
One suggestion, if you add maven jetty plugin config to pom.xml, people can just download the project sources and directly start the app with mvn package jetty:run
just add this to pom.xml
org.mortbay.jetty
jetty-maven-plugin
8.1.8.v20121106
10
<!–demo–>
8080
60000
This is very confusing , i can’t run the application , Couldn’t able to identify the where is the problem also.
Can anyone help me how exactly you created the code for this?
URL would be—- http://localhost:8080/SpringSecurityHelloWorld/welcome
its simple create one extra xml and add security code in it, then write in web.xml and it will work as run the project.
same here
Very useful. Thanks for posting.
I replaced
Welcome : ${pageContext.request.userPrincipal.name}
| <a href="” > Logout
by
I’m getting this error, any ideas ANYONE?
org.springframework.beans.factory.parsing.BeanDefinitionParsingException: Configuration problem: spring-security-web classes are not available. You need these to use
Offending resource: ServletContext resource [/WEB-INF/spring-security.xml]
better explain the stuff
For basic token based authentication the below worked for me based on Spring Security 3.1
Thank you mkyong..!!
Hi mkyong,
I used your tutorial for spring security. It is quite nice and simple explained. The only thing is that you have an error with which i couldn’t manage for couple of hours.
in mvc-dispatcher-servlet.xml you have , but it should be
Otherwise you get errors on handler not found.
Maybe it will be a good idea to fix this to not make someone else to spent so much time for a such small thing.
What was the error, I’m struggling against it apparently?
cheers
Hi mkyong, my question is: Why the name for Spring Security XML file (spring-security.xml) can be changed, I mean I’m using security.xml and the example works fine.
Hi MkYong, I am stuck at configuring spring security with Spring Boot.
Actually my problem is that i want to build secured application with my custom login form and user should authenticated after successful login. also i want to enable csrf protection for REST url’s. If you have already developed this then please guide me. Thank you for appreciating.
You should use in spring-security.xml
I am integrating this with JSF and spring MVC. I am getting the login page and upon successful login I can click on different flows. However, when I am submitting some data though commandbutton, the ajax method is not getting invoked. Same is happening when I use the code provided in spring security reference doc for programmatic config. Any idea?
Failed to evaluate expression ‘ROLE_USER’
Try this in place of ROLE_USER in intercept-url tag:
hasRole(‘ROLE_USER’)
Change this line in spring-security.xml
by
hope this helps ^^
I’m having the same issue with spring-security 4.0.1 as well.
I have the same problem.
I’m using spring-security 4.0.0
can any1 exaplin step by step structure,. i am still confused u r creating dynamic web project or maven project.. so pls explain. every steps only
Tell me please where your loginPage.jsp???
if you do not define any custom login form, Spring will create a simple login form automatically.
Thank you. Tell me please how spring know how build this page(how spring know css and html)?
it’s preprogrammed
Thanks mkyong for this. This post helped me a lot in getting quickly started with spring security.