
This tutorial shows you how to install OpenJDK 8, 11, 16, and other JDK builds on Ubuntu 20.
- 1. APT Install JDK (OpenJDK 8 and 11)
- 2. Install JDK manually (OpenJDK 16)
- 3. Install Oracle JDK on Ubuntu
- 4. Switch between different JDK versions
- 5. Add JAVA_HOME to Ubuntu environment variable
- 6. References
1. APT Install JDK (OpenJDK 8 and 11)
This example shows how to use apt install to install the OpenJDK 8 and 11 on Ubuntu.
1.1 We can use sudo apt search openjdk to find all available OpenJDK in the default repository. The below search result show four OpenJDK are available to install.
$ sudo apt search openjdk

openjdk-11-jdk/focal-updates,focal-security,now 11.0.10+9-0ubuntu1~20.04 amd64 [installed]
  OpenJDK Development Kit (JDK)

openjdk-13-jdk/focal-updates 13.0.4+8-1~20.04 amd64
  OpenJDK Development Kit (JDK)

openjdk-14-jdk/focal-updates 14.0.2+12-1~20.04 amd64
  OpenJDK Development Kit (JDK)

openjdk-8-jdk/focal-updates,focal-security 8u282-b08-0ubuntu1~20.04 amd64
  OpenJDK Development Kit (JDK)

# ...
1.2 If we want to install Java 8.
$ sudo apt install openjdk-8-jdk
1.3 If we want to install Java 11.
$ sudo apt install openjdk-11-jdk
1.4 Where is JDK installed?
The apt install the Java JDK at this path /usr/lib/jvm.
ls -lsa /usr/lib/jvm

4 drwxr-xr-x   5 root root 4096 Mac  29 15:06 .
4 drwxr-xr-x 125 root root 4096 Mac   5 11:51 ..
0 lrwxrwxrwx   1 root root   21 Jul  16  2020 java-1.11.0-openjdk-amd64 -> java-11-openjdk-amd64
4 -rw-r--r--   1 root root 2044 Jan  20 10:32 .java-1.11.0-openjdk-amd64.jinfo
4 drwxr-xr-x   9 root root 4096 Feb  18 13:54 java-11-openjdk-amd64
0 lrwxrwxrwx   1 root root   20 Jan  20 11:59 java-1.8.0-openjdk-amd64 -> java-8-openjdk-amd64
4 -rw-r--r--   1 root root 2764 Jan  20 11:59 .java-1.8.0-openjdk-amd64.jinfo
4 drwxr-xr-x   7 root root 4096 Mac  29 15:06 java-8-openjdk-amd64
4 drwxr-xr-x   3 root root 4096 Feb  18 13:53 openjdk-11
1.5 And the global /usr/bin/java is linked to one of the installed JDK.
$ which java
/usr/bin/java

$ ls -lsa /usr/bin/java
0 lrwxrwxrwx 1 root root 22 Sep  14  2020 /usr/bin/java -> /etc/alternatives/java

$ ls -lsa /etc/alternatives/java
0 lrwxrwxrwx 1 root root 46 Mac  29 15:15 /etc/alternatives/java -> /usr/lib/jvm/java-8-openjdk-amd64/jre/bin/java
1.6 We can use java -version to verify if Java JDK is installed correctly.
$ java -version

openjdk version "1.8.0_282"
OpenJDK Runtime Environment (build 1.8.0_282-8u282-b08-0ubuntu1~20.04-b08)
OpenJDK 64-Bit Server VM (build 25.282-b08, mixed mode)
2. Install JDK manually (OpenJDK 16)
If we want the latest Java JDK, for example JDK 16, early-access builds, or other JDK builds like AdoptOpenJDK, which are not available in the Ubuntu default repository. We can still download the JDK and install it on Ubuntu manually.
This example will install the JDK 16.
2.1 Visit the official OpenJDK 16 page.
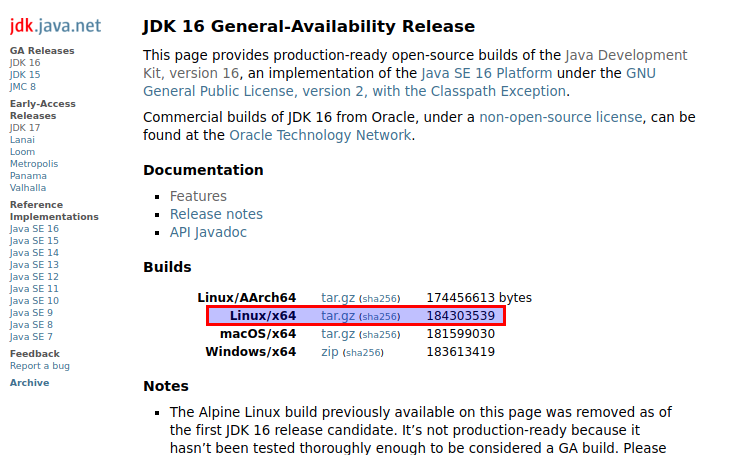
2.2 Extracts the downloaded JDK to /opt/jdk-16.
$ sudo mkdir /opt/jdk-16
$ sudo tar -zxf ~/Downloads/openjdk-16_linux-x64_bin.tar.gz -C /opt/jdk-16

$ ls -lsa /opt/jdk-16

ls -lsa /opt/jdk-16
total 36
4 drwxr-xr-x  8 root  root  4096 Mac  10 13:18 .
4 drwxr-xr-x  5 root  root  4096 Mac  15 14:09 ..
4 drwxr-xr-x  2 root  root  4096 Mac  10 13:18 bin
4 drwxr-xr-x  5 root  root  4096 Mac  10 13:18 conf
4 drwxr-xr-x  3 root  root  4096 Mac  10 13:18 include
4 drwxr-xr-x  2 root  root  4096 Mac  10 13:18 jmods
4 drwxr-xr-x 69 root  root  4096 Mac  10 13:18 legal
4 drwxr-xr-x  5 root  root  4096 Mac  10 13:18 lib
4 -rw-r--r--  1 10668 10668 1133 Feb   8 19:40 release
2.3 This update-alternatives --install /usr/bin/java java let the Ubuntu know there is one more option /opt/jdk-16/bin/java for the /etc/alternatives/java link.
$ sudo update-alternatives --install /usr/bin/java java /opt/jdk-16/bin/java 100
2.4 Update the /etc/alternatives/java link.
The below result shows 5 JDK installed on this Ubuntu; choose option 2 for the above extracted JDK 16 /opt/jdk-16/bin/java.
$ sudo update-alternatives --config java

There are 4 choices for the alternative java (providing /usr/bin/java).

  Selection    Path                                            Priority   Status
------------------------------------------------------------
  0            /usr/lib/jvm/java-11-openjdk-amd64/bin/java      1111      auto mode
  1            /opt/jdk-15/bin/java                             100       manual mode
  2            /opt/jdk-16/bin/java                             100       manual mode
  3            /usr/lib/jvm/java-11-openjdk-amd64/bin/java      1111      manual mode
* 4            /usr/lib/jvm/java-8-openjdk-amd64/jre/bin/java   1081      manual mode

Press <enter> to keep the current choice[*], or type selection number: 2
update-alternatives: using /opt/jdk-16/bin/java to provide /usr/bin/java (java) in manual mode
2.5 Verification.
$ java -version

openjdk version "16" 2021-03-16
OpenJDK Runtime Environment (build 16+36-2231)
OpenJDK 64-Bit Server VM (build 16+36-2231, mixed mode, sharing)
3. Install Oracle JDK on Ubuntu
We need to create an Oracle account to download the Oracle JDK. Please visit the official Oracle JDK link to download the JDK and follow the above install JDK manually, and it works the same.
The Oracle JDK 11 and above are paid products, and you need a license for production use. However, it’s still free to download for development and testing.
Note
In the old days, we can install the Oracle JDK in the following ways, but it failed now; please read New Oracle Java 11 Installer For Ubuntu
Install Oracle JDK 11 (Not working now)
$ sudo add-apt-repository ppa:linuxuprising/java
$ sudo apt update
$ sudo apt install oracle-java11-installer
Install Oracle JDK 8
$ sudo add-apt-repository ppa:webupd8team/java
$ sudo apt update
$ sudo apt install oracle-java8-installer
4. Switch between different JDK versions
4.1 Review the relationship for /usr/bin/java and /etc/alternatives/java.
$ which java
/usr/bin/java

$ ls -lsa /usr/bin/java
0 lrwxrwxrwx 1 root root 22 Sep  14  2020 /usr/bin/java -> /etc/alternatives/java

$ ls -lsa /etc/alternatives/java
0 lrwxrwxrwx 1 root root 46 Mac  29 15:15 /etc/alternatives/java -> /usr/lib/jvm/java-8-openjdk-amd64/jre/bin/java
4.2 For any new downloaded JDK, run update-alternatives --install /usr/bin/java java to let Ubuntu know there is an extra option for the /usr/bin/java.
4.3 For multiple installed JDK, we can run update-alternatives --config java select which JDK to use.
$ sudo update-alternatives --config java

There are 4 choices for the alternative java (providing /usr/bin/java).

  Selection    Path                                            Priority   Status
------------------------------------------------------------
  0            /usr/lib/jvm/java-11-openjdk-amd64/bin/java      1111      auto mode
  1            /opt/jdk-15/bin/java                             100       manual mode
* 2            /opt/jdk-16/bin/java                             100       manual mode
  3            /usr/lib/jvm/java-11-openjdk-amd64/bin/java      1111      manual mode
  4            /usr/lib/jvm/java-8-openjdk-amd64/jre/bin/java   1081      manual mode
5. Add JAVA_HOME to Ubuntu environment variable
Many servers, frameworks, and tools depend on the JAVA_HOME environment variable to find the installed Java. On Ubuntu, we can add the JAVA_HOME to the system-wide environment variables – /etc/environment.
5.1 Open the file /etc/environment with your favorite text editors like vi, vim, or nano.
$ sudo vim /etc/environment
5.2 Add JAVA_HOME at a new line and point it to one of the installed JDK.
PATH="/usr/local/sbin:/usr/local/bin:/usr/sbin:/usr/bin:/sbin:/bin:/usr/games:/usr/local/games:/snap/bin"
JAVA_HOME=/usr/lib/jvm/java-11-openjdk-amd64/
5.3 source /etc/environment to reflect the changes in the current session.
$ source /etc/environment

$ echo $JAVA_HOME
/usr/lib/jvm/java-11-openjdk-amd64/
Note
The new changes will disappear if we close the current session or reopen a new terminal because a new shell does not trigger the /etc/environment. Try to restart the Ubuntu or login again; the new changes in /etc/environment will apply automatically.
On Ubuntu 20.10 “Install Oracle JDK 8”
E: Package ‘oracle-java8-installer’ has no installation candidate
So oracle cut java runtime for software, where OpenJDK is not working