This article is outdated, please refer to the latest Hibernate 3.6 tutorial at – Maven 3 + Hibernate 3.6 + Oracle 11g Example (XML Mapping).
This quick guide show you how to use Maven to generate a simple Java project, and uses Hibernate to insert a record into MySQL database.
Tools & technologies used in this article :
- Maven 2.2.1
- JDK 1.6.0_13
- Hibernate 3.2.3.GA
- MySQL 5.0
1. Table Creation
MySQL script to create a “stock” table.
DROP TABLE IF EXISTS `stock`;
CREATE TABLE `stock` (
  `STOCK_ID` INT(10) UNSIGNED NOT NULL AUTO_INCREMENT,
  `STOCK_CODE` VARCHAR(10) NOT NULL,
  `STOCK_NAME` VARCHAR(20) NOT NULL,
  PRIMARY KEY (`STOCK_ID`) USING BTREE,
  UNIQUE KEY `UNI_STOCK_NAME` (`STOCK_NAME`),
  UNIQUE KEY `UNI_STOCK_ID` (`STOCK_CODE`) USING BTREE
) ENGINE=InnoDB DEFAULT CHARSET=utf8;
2. Generate project structure with Maven
In command prompt, Issue “mvn archetype:generate“, choose project #15 to create a quick start Maven’s java project, then fill in your project’s information – groupId , artifactId and package.
E:\workspace>mvn archetype:generate
[INFO] Scanning for projects...
...
Choose a number:
(1/2/3....) 15: : 15
...
Define value for groupId: : com.mkyong.common
Define value for artifactId: : HibernateExample
Define value for version:  1.0-SNAPSHOT: :
Define value for package:  com.mkyong.common: : com.mkyong.common
[INFO] OldArchetype created in dir: E:\workspace\HibernateExample
[INFO] ------------------------------------------------------------------------
[INFO] BUILD SUCCESSFUL
[INFO] ------------------------------------------------------------------------
3. Convert to Eclipse project
Issue “mvn eclipse:eclipse” to convert the newly generated project to Eclipse’s style project
4. Import converted project into Eclipse IDE
In Eclipse IDE, Choose File –> Import –> General folder, Existing Projects into Workspace –>Choose your project folder location. Done
5. Create a resources folder
Create a resources folder under “src/main” folder, “/src/main/resources” , later all the Hibernate’s xml files will put here. Maven will treat all files in this folder as resources files, and copy it to output classes automatically.
6. Review project structure
Make sure the folder structure as following

Maven will generate all the Java’s standard folders structure for you (beside resources folder, quick start archetype #15 does not contains the resources folder)
7. Add Hibernate and MySQL dependency
Modify the Maven’s pom.xml file, add support for Hibernate and MySQL. Hibernate is required dom4j, commons-logging, commons-collections and cglib as dependency library, add it.
File : pom.xml
<project ...>
<modelVersion>4.0.0</modelVersion>
  <groupId>com.mkyong.common</groupId>
  <artifactId>HibernateExample</artifactId>
  <packaging>jar</packaging>
  <version>1.0-SNAPSHOT</version>
  <name>HibernateExample</name>
  <url>http://maven.apache.org</url>
  <dependencies>

    <dependency>
      <groupId>junit</groupId>
      <artifactId>junit</artifactId>
      <version>3.8.1</version>
      <scope>test</scope>
    </dependency>

        <!-- MySQL database driver -->
	<dependency>
		<groupId>mysql</groupId>
		<artifactId>mysql-connector-java</artifactId>
		<version>5.1.9</version>
	</dependency>

	<!-- Hibernate framework -->
	<dependency>
		<groupId>hibernate</groupId>
		<artifactId>hibernate3</artifactId>
		<version>3.2.3.GA</version>
	</dependency>


	<!-- Hibernate library dependecy start -->
	<dependency>
		<groupId>dom4j</groupId>
		<artifactId>dom4j</artifactId>
		<version>1.6.1</version>
	</dependency>

	<dependency>
		<groupId>commons-logging</groupId>
		<artifactId>commons-logging</artifactId>
		<version>1.1.1</version>
	</dependency>

	<dependency>
		<groupId>commons-collections</groupId>
		<artifactId>commons-collections</artifactId>
		<version>3.2.1</version>
	</dependency>

	<dependency>
		<groupId>cglib</groupId>
		<artifactId>cglib</artifactId>
		<version>2.2</version>
	</dependency>
	<!-- Hibernate library dependecy end -->

	<dependency>
		<groupId>javax.transaction</groupId>
		<artifactId>jta</artifactId>
		<version>1.1</version>
	</dependency>

  </dependencies>
</project>
Issue the “mvn eclipse:eclipse“, Maven will download all Hibernate and MySQL libraries automatically and put into Maven’s local repository. At the same time, Maven will add the downloaded libraries into Eclipse “.classpath” for dependency purpose. Like it again 🙂 , no need to find the library and copy it myself.
8. Create Hibernate Mapping file + Model class
In prerequisite requirement , a table named “stock” is created, now you will need to create a Hibernate XML mapping file and model class for it.
Create a Stock.hbm.xml file and put it in “src/main/resources/com/mkyong/common/Stock.hbm.xml“. Create “resources/com/mkyong/common/” folder if it does not exists.
File : Stock.hbm.xml
<?xml version="1.0"?>
<!DOCTYPE hibernate-mapping PUBLIC "-//Hibernate/Hibernate Mapping DTD 3.0//EN"
"http://hibernate.sourceforge.net/hibernate-mapping-3.0.dtd">

<hibernate-mapping>
    <class name="com.mkyong.common.Stock" table="stock" catalog="mkyong">
        <id name="stockId" type="java.lang.Integer">
            <column name="STOCK_ID" />
            <generator class="identity" />
        </id>
        <property name="stockCode" type="string">
            <column name="STOCK_CODE" length="10" not-null="true" unique="true" />
        </property>
        <property name="stockName" type="string">
            <column name="STOCK_NAME" length="20" not-null="true" unique="true" />
        </property>
    </class>
</hibernate-mapping>
Create a Stock.java file and put it in “src/main/java/com/mkyong/common/Stock.java”
File : Stock.java
package com.mkyong.common;

/**
 * Model class for Stock
 */
public class Stock implements java.io.Serializable {

	private static final long serialVersionUID = 1L;

	private Integer stockId;
	private String stockCode;
	private String stockName;

	public Stock() {
	}

	public Stock(String stockCode, String stockName) {
		this.stockCode = stockCode;
		this.stockName = stockName;
	}

	public Integer getStockId() {
		return this.stockId;
	}

	public void setStockId(Integer stockId) {
		this.stockId = stockId;
	}

	public String getStockCode() {
		return this.stockCode;
	}

	public void setStockCode(String stockCode) {
		this.stockCode = stockCode;
	}

	public String getStockName() {
		return this.stockName;
	}

	public void setStockName(String stockName) {
		this.stockName = stockName;
	}

}
Create the model class and mapping files are quite tedious in large application, With Hibernate tools, this can be generate automatically, check this article – Hibernate tools to generate it automatically.
9. Create Hibernate Configuration file
Create a Hibernate’s configuration file and put under the resources root folder, “src/main/resources/hibernate.cfg.xml“. Fill in your MySQL setting accordingly.
File : hibernate.cfg.xml
<?xml version="1.0" encoding="utf-8"?>
<!DOCTYPE hibernate-configuration PUBLIC
"-//Hibernate/Hibernate Configuration DTD 3.0//EN"
"http://hibernate.sourceforge.net/hibernate-configuration-3.0.dtd">
<hibernate-configuration>
    <session-factory>
        <property name="hibernate.bytecode.use_reflection_optimizer">false</property>
        <property name="hibernate.connection.driver_class">com.mysql.jdbc.Driver</property>
        <property name="hibernate.connection.password">password</property>
        <property name="hibernate.connection.url">jdbc:mysql://localhost:3306/mkyong</property>
        <property name="hibernate.connection.username">root</property>
        <property name="hibernate.dialect">org.hibernate.dialect.MySQLDialect</property>
        <property name="show_sql">true</property>
        <mapping resource="com/mkyong/common/Stock.hbm.xml"></mapping>
    </session-factory>
</hibernate-configuration>
Set the “show_sql” property to true will output the Hibernate SQL statement. Hibernate Dialect is telling your Hibernate application which SQL it has to generate to talk to your database. Please refer this article for other database dialect – Hibernate dialect collection.
10. Create Hibernate Utility class
Create a HibernateUtil.java class to take care of Hibernate start up and retrieve the session easily. Create a persistence folder and put this file in it, “src/main/java/com/mkyong/persistence/HibernateUtil.java”
File : HibernateUtil.java
package com.mkyong.persistence;

import org.hibernate.SessionFactory;
import org.hibernate.cfg.Configuration;

public class HibernateUtil {

    private static final SessionFactory sessionFactory = buildSessionFactory();

    private static SessionFactory buildSessionFactory() {
        try {
            // Create the SessionFactory from hibernate.cfg.xml
            return new Configuration().configure().buildSessionFactory();
        }
        catch (Throwable ex) {
            // Make sure you log the exception, as it might be swallowed
            System.err.println("Initial SessionFactory creation failed." + ex);
            throw new ExceptionInInitializerError(ex);
        }
    }

    public static SessionFactory getSessionFactory() {
        return sessionFactory;
    }

    public static void shutdown() {
    	// Close caches and connection pools
    	getSessionFactory().close();
    }

}
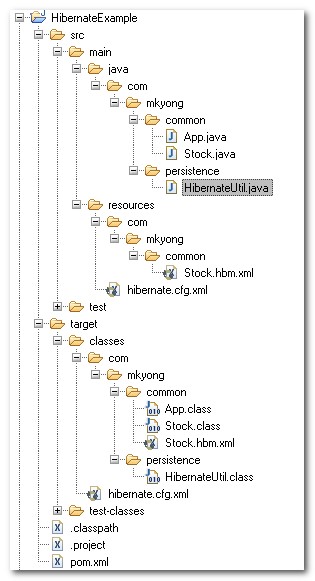
11. Review project structure again
Sound like create many new files and folders, review it and make sure the folder structure as following
12. Code it to save the record
Modify the default App.java class as following :
File : App.java
package com.mkyong.common;

import org.hibernate.Session;
import com.mkyong.persistence.HibernateUtil;

public class App
{
    public static void main( String[] args )
    {
        System.out.println("Maven + Hibernate + MySQL");
        Session session = HibernateUtil.getSessionFactory().openSession();

        session.beginTransaction();
        Stock stock = new Stock();

        stock.setStockCode("4715");
        stock.setStockName("GENM");

        session.save(stock);
        session.getTransaction().commit();
    }
}
13. Run it and see output
Run your App.java, it will insert a new record into “Stock” table.
Maven + Hibernate + MySQL
...
Dec 17, 2009 5:05:26 PM org.hibernate.impl.SessionFactoryObjectFactory addInstance
INFO: Not binding factory to JNDI, no JNDI name configured
Hibernate: insert into mkyong.stock (STOCK_CODE, STOCK_NAME) values (?, ?)
Done.
i want to add external file properties to Hibernate.cfg.xml.. how ?
FYI : Please use below dependencies for this example code and everything works fine 🙂
JBoss repository
http://repository.jboss.org/nexus/content/groups/public/
mysql
mysql-connector-java
5.1.33
org.hibernate
hibernate-core
3.6.3.Final
javassist
javassist
3.12.1.GA
javax.transaction
jta
1.1
Thank you very much! so so greate! I am facing hybernat problem til 3 days and now ok. Thanksful!
simple, but useful
hibernate
hibernate3
3.2.3.GA
This dependency seems to be wrong.
Exception in thread “main” java.lang.UnsupportedClassVersionError: org/hibernate/Session : Unsupported major.minor version 52.0
at java.lang.ClassLoader.defineClass1(Native Method)
at java.lang.ClassLoader.defineClass(ClassLoader.java:792)
at java.security.SecureClassLoader.defineClass(SecureClassLoader.java:142)
at java.net.URLClassLoader.defineClass(URLClassLoader.java:449)
at java.net.URLClassLoader.access$100(URLClassLoader.java:71)
at java.net.URLClassLoader$1.run(URLClassLoader.java:361)
at java.net.URLClassLoader$1.run(URLClassLoader.java:355)
at java.security.AccessController.doPrivileged(Native Method)
at java.net.URLClassLoader.findClass(URLClassLoader.java:354)
at java.lang.ClassLoader.loadClass(ClassLoader.java:424)
at sun.misc.Launcher$AppClassLoader.loadClass(Launcher.java:308)
at java.lang.ClassLoader.loadClass(ClassLoader.java:357)
at java.lang.Class.getDeclaredMethods0(Native Method)
at java.lang.Class.privateGetDeclaredMethods(Class.java:2521)
at java.lang.Class.getMethod0(Class.java:2764)
at java.lang.Class.getMethod(Class.java:1653)
at sun.launcher.LauncherHelper.getMainMethod(LauncherHelper.java:494)
at sun.launcher.LauncherHelper.checkAndLoadMain(LauncherHelper.java:486)
I am facing this error. kindly help..
The hibernate dependency seems to be wrong ( the artifactId).
Try
org.hibernate
hibernate
3.2.3.ga
See http://mvnrepository.com/artifact/org.hibernate/hibernate/3.2.3.ga
Is it working using Denwer?
You have to add
HibernateUtil.getSessionFactory().close();
at the end of main method.
Hi..Could you please share the details of implementing multi tenancy using hibernate4 and jpa
final pom.xml looks like this
4.0.0
com.hibernate.ex
HibernateSample
0.0.1-SNAPSHOT
jar
HibernateSample
http://maven.apache.org
UTF-8
junit
junit
3.8.1
test
mysql
mysql-connector-java
5.1.9
org.hibernate
hibernate
3.2.3.ga
dom4j
dom4j
1.6.1
commons-logging
commons-logging
1.1.1
commons-collections
commons-collections
3.2.1
cglib
cglib
2.2
javax.transaction
jta
1.1
asm
asm
3.1
in hibernate version 4. 3 both buildSessionfactory() and ServiceRegistryBuilder() are deprecated.
so u have change your coding like below to get session factory for hibernate version 4.3
public class HibernateSessionFactory {
private static final SessionFactory sessionFactory = buildSessionFactory1();
private static SessionFactory buildSessionFactory1() {
Configuration configuration = new Configuration().configure(); // configuration
// settings
// from
// hibernate.cfg.xml
StandardServiceRegistryBuilder serviceRegistryBuilder = new StandardServiceRegistryBuilder();
serviceRegistryBuilder.applySettings(configuration.getProperties());
ServiceRegistry serviceRegistry = serviceRegistryBuilder.build();
return configuration.buildSessionFactory(serviceRegistry);
}
public static SessionFactory getSessionFactory() {
return sessionFactory;
}
public static void shutdown() {
// Close caches and connection pools
getSessionFactory().close();
}
}
cglib
cglib-nodep
3.1
Replace the cglib dependency with the above one and that should fix it! Happy Coding 🙂
org.hibernate
hibernate
3.2.3.ga
Hi,
Yesterday I wrote one hiberanate program for curd operation as well as in JDBC also.But I am getting JDBC more faster than hibernate.So, why people says that hibernate is fister than JDBC.
Can you show your implementation? I’m new at the Java world and i want to make a crud app aswell
Really very helpful. Thank you.
What is the use of implementing java.io.serializable interface?
Can’t we able to achieve the functionality without implementing serializable interface?
Need to Change in pom.xml
org.hibernate
hibernate
3.2.3.ga
<dependency>
<groupId>org.hibernate </groupId>
<artifactId>hibernate </artifactId>
<version>3.2.3.ga </version>
</dependency>
Please Help: I tried this example, got the error:
Initial SessionFactory creation failed.org.hibernate.HibernateException: Unable to instantiate default tuplizer [org.hibernate.tuple.entity.PojoEntityTuplizer]
Exception in thread “main” java.lang.ExceptionInInitializerError
at com.mkyong.persistence.HibernateUtil.buildSessionFactory(HibernateUtil.java:18)
at com.mkyong.persistence.HibernateUtil.(HibernateUtil.java:8)
at com.mkyong.common.App.main(App.java:11)
Caused by: org.hibernate.HibernateException: Unable to instantiate default tuplizer [org.hibernate.tuple.entity.PojoEntityTuplizer]
at org.hibernate.tuple.entity.EntityTuplizerFactory.constructTuplizer(EntityTuplizerFactory.java:110)
at org.hibernate.tuple.entity.EntityTuplizerFactory.constructDefaultTuplizer(EntityTuplizerFactory.java:135)
at org.hibernate.tuple.entity.EntityEntityModeToTuplizerMapping.(EntityEntityModeToTuplizerMapping.java:56)
at org.hibernate.tuple.entity.EntityMetamodel.(EntityMetamodel.java:323)
at org.hibernate.persister.entity.AbstractEntityPersister.(AbstractEntityPersister.java:433)
at org.hibernate.persister.entity.SingleTableEntityPersister.(SingleTableEntityPersister.java:109)
at org.hibernate.persister.PersisterFactory.createClassPersister(PersisterFactory.java:55)
at org.hibernate.impl.SessionFactoryImpl.(SessionFactoryImpl.java:231)
at org.hibernate.cfg.Configuration.buildSessionFactory(Configuration.java:1313)
at com.mkyong.persistence.HibernateUtil.buildSessionFactory(HibernateUtil.java:13)
… 2 more
Caused by: java.lang.reflect.InvocationTargetException
at sun.reflect.NativeConstructorAccessorImpl.newInstance0(Native Method)
at sun.reflect.NativeConstructorAccessorImpl.newInstance(Unknown Source)
at sun.reflect.DelegatingConstructorAccessorImpl.newInstance(Unknown Source)
at java.lang.reflect.Constructor.newInstance(Unknown Source)
at org.hibernate.tuple.entity.EntityTuplizerFactory.constructTuplizer(EntityTuplizerFactory.java:107)
… 11 more
Caused by: java.lang.NoSuchMethodError: org.objectweb.asm.ClassWriter.(I)V
at net.sf.cglib.core.DebuggingClassWriter.(DebuggingClassWriter.java:47)
at net.sf.cglib.core.DefaultGeneratorStrategy.getClassWriter(DefaultGeneratorStrategy.java:30)
at net.sf.cglib.core.DefaultGeneratorStrategy.generate(DefaultGeneratorStrategy.java:24)
at net.sf.cglib.core.AbstractClassGenerator.create(AbstractClassGenerator.java:216)
at net.sf.cglib.core.KeyFactory$Generator.create(KeyFactory.java:144)
at net.sf.cglib.core.KeyFactory.create(KeyFactory.java:116)
at net.sf.cglib.core.KeyFactory.create(KeyFactory.java:108)
at net.sf.cglib.core.KeyFactory.create(KeyFactory.java:104)
at net.sf.cglib.proxy.Enhancer.(Enhancer.java:69)
at org.hibernate.proxy.pojo.cglib.CGLIBLazyInitializer.getProxyFactory(CGLIBLazyInitializer.java:117)
at org.hibernate.proxy.pojo.cglib.CGLIBProxyFactory.postInstantiate(CGLIBProxyFactory.java:43)
at org.hibernate.tuple.entity.PojoEntityTuplizer.buildProxyFactory(PojoEntityTuplizer.java:188)
at org.hibernate.tuple.entity.AbstractEntityTuplizer.(AbstractEntityTuplizer.java:128)
at org.hibernate.tuple.entity.PojoEntityTuplizer.(PojoEntityTuplizer.java:78)
… 16 more
somehow removing cglib jar from pom.xml worked for me. I think you might have already found the answer, but it might help someone else.
thx a lot Naveen!
Thankfulness to my father who told me regarding this website, this
website is really remarkable.
It’s very effortless to find out any topic on net as compared to books, as I found this post at this web page.
Hi
This is an amazing tuto and really works.
But I have a little question what about if I want to create a .jar file of this app?
I tried to do it but doenst work, what is needed to do it? another kind of configuration to run in standalone mode?
Please I need to know! xd
Thanks a lot
Hi,Thanks for making the thing simple for us.Your example are really useful to learn.I learnt Spring only from your example.Thanks a lot.Now i started Hibernate.I was trying with the first example and i am gettinh the below exception.Can you plz help me to sort it …
Initial SessionFactory creation failed.java.lang.NoClassDefFoundError: org/dom4j/DocumentException
Exception in thread “main” java.lang.ExceptionInInitializerError
at com.mukesh.hibernate.testing.HibernateTest.HibernateUtil.buildSessionFactory(HibernateUtil.java:17)
at com.mukesh.hibernate.testing.HibernateTest.HibernateUtil.(HibernateUtil.java:8)
at com.mukesh.hibernate.testing.HibernateTest.App.main(App.java:12)
Caused by: java.lang.NoClassDefFoundError: org/dom4j/DocumentException
at com.mukesh.hibernate.testing.HibernateTest.HibernateUtil.buildSessionFactory(HibernateUtil.java:13)
… 2 more
Caused by: java.lang.ClassNotFoundException: org.dom4j.DocumentException
at java.net.URLClassLoader$1.run(URLClassLoader.java:202)
at java.security.AccessController.doPrivileged(Native Method)
at java.net.URLClassLoader.findClass(URLClassLoader.java:190)
at java.lang.ClassLoader.loadClass(ClassLoader.java:307)
at sun.misc.Launcher$AppClassLoader.loadClass(Launcher.java:301)
at java.lang.ClassLoader.loadClass(ClassLoader.java:248)
… 3 more
How to solve
org.hibernate.PropertyValueException: not-null property references a null or transient value
How to perform CRUD operation in Hibernate of netbeans7.0. pls give examples
Fastidious response in return of this issue with firm arguments and explaining
all concerning that.
At the step 13,how to run the application??
I got it ,Thank you.
From my humble opinion, most maven dependencies are not necessary, for your examples, “hibernate core” and “mysql-connector” dependency are sufficient. Anyway, your tutorial is easy to follow, thank you very much!
Great Hibernate Tutorial straight to the point super helpful!
I am getting a “hibernate.cfg.xml” not found exception. Have tried all the possible solutions available on the net. Any idea why this might be happening…
Make sure hibernate.cfg.xml in your project classpath.
Hi,
Thank You for your reply 😉
I Solved the problem. But I had to load the file from the Hibernate util by creating a file object and providing the physical path of the file on the machine. Any idea why this might be needed? I think there is some issue with eclipse (not sure though).