In this tutorial, we show you how to create a custom dialog in Android. See following steps :
- Create a custom dialog layout (XML file).
- Attach the layout to
Dialog. - Display the
Dialog. - Done.
P.S This project is developed in Eclipse 3.7, and tested with Android 2.3.3.
Note
You may also interest to read this custom AlertDialog example.
You may also interest to read this custom AlertDialog example.
1 Android Layout Files
Two XML files, one for main screen, one for custom dialog.
File : res/layout/main.xml
<?xml version="1.0" encoding="utf-8"?>
<LinearLayout xmlns:android="http://schemas.android.com/apk/res/android"
    android:layout_width="fill_parent"
    android:layout_height="fill_parent"
    android:orientation="vertical" >

    <Button
        android:id="@+id/buttonShowCustomDialog"
        android:layout_width="wrap_content"
        android:layout_height="wrap_content"
        android:text="Show Custom Dialog" />

</LinearLayout>
File : res/layout/custom.xml
<?xml version="1.0" encoding="utf-8"?>
<RelativeLayout xmlns:android="http://schemas.android.com/apk/res/android"
    android:layout_width="fill_parent"
    android:layout_height="fill_parent" >

    <ImageView
        android:id="@+id/image"
        android:layout_width="wrap_content"
        android:layout_height="wrap_content"
        android:layout_marginRight="5dp" />

    <TextView
        android:id="@+id/text"
        android:layout_width="fill_parent"
        android:layout_height="wrap_content"
        android:textColor="#FFF"
        android:layout_toRightOf="@+id/image"/>/>

     <Button
        android:id="@+id/dialogButtonOK"
        android:layout_width="100px"
        android:layout_height="wrap_content"
        android:text=" Ok "
        android:layout_marginTop="5dp"
        android:layout_marginRight="5dp"
        android:layout_below="@+id/image"
        />

</RelativeLayout>
2. Activity
Read the comment and demo in next step, it should be self-explorary.
File : MainActivity.java
package com.mkyong.android;

import android.app.Activity;
import android.app.Dialog;
import android.content.Context;
import android.os.Bundle;
import android.view.View;
import android.view.View.OnClickListener;
import android.widget.Button;
import android.widget.ImageView;
import android.widget.TextView;

public class MainActivity extends Activity {

	final Context context = this;
	private Button button;

	public void onCreate(Bundle savedInstanceState) {

		super.onCreate(savedInstanceState);
		setContentView(R.layout.main);

		button = (Button) findViewById(R.id.buttonShowCustomDialog);

		// add button listener
		button.setOnClickListener(new OnClickListener() {

		  @Override
		  public void onClick(View arg0) {

			// custom dialog
			final Dialog dialog = new Dialog(context);
			dialog.setContentView(R.layout.custom);
			dialog.setTitle("Title...");

			// set the custom dialog components - text, image and button
			TextView text = (TextView) dialog.findViewById(R.id.text);
			text.setText("Android custom dialog example!");
			ImageView image = (ImageView) dialog.findViewById(R.id.image);
			image.setImageResource(R.drawable.ic_launcher);

			Button dialogButton = (Button) dialog.findViewById(R.id.dialogButtonOK);
			// if button is clicked, close the custom dialog
			dialogButton.setOnClickListener(new OnClickListener() {
				@Override
				public void onClick(View v) {
					dialog.dismiss();
				}
			});

			dialog.show();
		  }
		});
	}
}
3. Demo
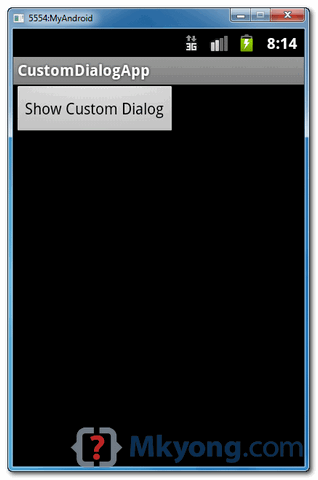
Start it, the “main.xml” layout is display.
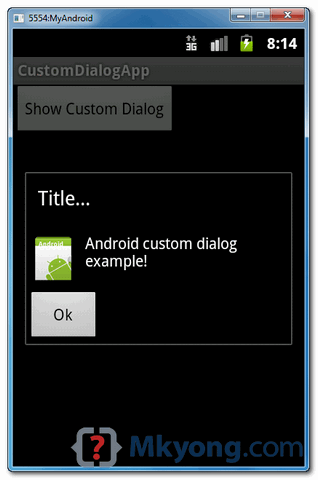
Click on the button, display custom dialog “custom.xml” layout, if you click on the “OK” button, dialog box will be closed.
Download Source Code
Download it – Android-Custom-Dialog-Example.zip (16 KB)

Thanks You!
Cool.
How do I get this intrusive shit out of my shitty Motorola phone
Thank you so much ! you saved me so much time
I really like and appreciate your blog post.Thanks Again.
Please try to put some new android dialog box easy example to us.
Thanks bro…
Thank you
I really like and appreciate your blog post.Thanks Again. febdcacdkefdkcce
pl z solution this problem.
This time problem on create how to drop down list item click to open in the popup windows and alert show on activity.
for example drop down 4 item (a, b, c, d) choose the a activity start the first popup or alert message after that show in main activity
Hi Thank you this topic is useful.
this tutorials is very helpful thank you
hi iam moein thank you very much for your tutorials
Nice one! easy to understand
Thanks, that’s helpful me too.
Very helpful thx
when i put another button so it crash When i comment it works perfectly Please help me see my code here Thanks in advance
final Dialog dialog = new Dialog(MainActivity.this);
dialog.setContentView(R.layout.custom_dialog);
dialog.setTitle(“Quit”);
// set the custom dialog components – text, image and button
TextView text = (TextView) dialog.findViewById(R.id.textDialog);
text.setText(“ARE YOU SURE WANT TO LOG OUT?”);
// ImageView image = (ImageView)
// dialog.findViewById(R.id.imageDialog);
// image.setImageResource(R.drawable.image0);
Button Yes = (Button) dialog.findViewById(R.id.btn_dialog_yes);
// if button is clicked, close the custom dialog
Yes.setOnClickListener(new OnClickListener() {
@Override
public void onClick(View v) {
Intent logIn = new Intent(getApplicationContext(),
Login.class);
startActivity(logIn);
//dialog.dismiss();
}
});
Button No = (Button) dialog.findViewById(R.id.btn_dialog_no);
// if button is clicked, close the custom dialog
No.setOnClickListener(new OnClickListener() {
@Override
public void onClick(View v) {
dialog.dismiss();
}
});
dialog.show();
break;
Why not take a look at my blog about how to create an Android app that displays an Image in an ImageView control of the main Activity at the full width of the screen.
The app uses the following Android SDK objects:
. Display
. ImageView
. LinearLayout
. Bitmap
. Activity
. XML layout
. LayoutParams
Also:
. layout_width
. layout_height
. orientation
. id
. vertical
. match_parent
XML attributes and values are covered.
Click the link BELOW! to see
http://androidprogrammeringcorner.blogspot.com/2015/06/pak-longs-android-programming-corner.html
Simple as possible example..what a searcher always want to see. HIGHLY Recommended … easy to digest.. keep up the good work
Thank you so much ,this topic is usefull
It’s a shame you don’t correct your code. P. Nelnik is right, so rewrite your code !!
Thanks, lovely tutorial.
Thank you Mkyong for this tutorial, can you please tell me how can i
handle a click out side the dialog to close the dialog, in other words
in need to dismiss dialog by clicking out side dialog box.
Thanks
awesome blog…always firstly refer your blog for any query..
Thanks for the code. You could use Ben’s line as an option for who sets the title on the xml file itself.
Thanks alot my teacher <3
Good example
Excellent example, with help of this I’ve created my own-custom-pretty dialog
Thank you so much!
Thanks. Simple and straight to the point
Why do You declare the private Button button; and not as
Button button = (Button) findViewById(R.id.buttonShowCustomDialog);
The truth is the app crashes but I don’t understand why.
this was very useful to me but can some please let me know how to call a custom dialog from service i wrote the code inside onClick part in a different file passed the context from service and called the custom.xml file from the java file i wrote but its failing
Thanks, that’s helpful.
One little change I needed to make to get it to compile was to change the line:
dialogButton.setOnClickListener(new OnClickListener() {
to
dialogButton.setOnClickListener(new View.OnClickListener() {
Yes,Ur guide is ultimate,in same way shall I keep more than one images in DialogBox
Having trouble implimenting this, produces error when i access the option dialogs however, when i comment out the onclick meathod, it shows the dialog with out problem.
Any ideas?
package com.example.joybot; import android.os.Bundle; import android.app.Activity; import android.view.Menu; import android.view.MenuItem; import android.webkit.WebView; import android.webkit.WebSettings; import android.widget.EditText; import android.widget.RadioButton; import android.widget.RadioButton.*; import android.widget.TextView; import android.widget.Button; import com.MobileAnarchy.Android.Widgets.Joystick.JoystickClickedListener; import com.MobileAnarchy.Android.Widgets.Joystick.JoystickMovedListener; import com.MobileAnarchy.Android.Widgets.Joystick.JoystickView; import android.app.ActionBar; import android.app.Dialog; import android.content.Context; import android.view.View; import android.view.View.OnClickListener; import android.widget.Button.*; //import android.location.*; //import com.google.android.maps.*; public class MainActivity extends Activity { ActionBar actbar; TextView txtX, txtY; JoystickView joystick; WebView mapper; int joyx, joyy; WebSettings webSettings; final Context context = this; //MapView maptrack; @Override protected void onCreate(Bundle savedInstanceState) { super.onCreate(savedInstanceState); setContentView(R.layout.activity_main); // webSettings = myWebView.getSettings(); // webSettings.setJavaScriptEnabled(true); joystick = (JoystickView)findViewById(R.id.joystickView); mapper = (WebView)findViewById(R.id.webView); webSettings = mapper.getSettings(); webSettings.setBuiltInZoomControls(true); mapper.loadUrl("http://www.google.com.au"); joystick.setOnJostickMovedListener(_listener); } private JoystickMovedListener _listener = new JoystickMovedListener() { @Override public void OnMoved(int pan, int tilt) { //txtX.setText(Integer.toString(pan)); joyx=pan; joyy=tilt; //txtY.setText(Integer.toString(tilt)); } @Override public void OnReleased() { // txtX.setText("released"); // txtY.setText("released"); joyx=0; joyy=0; } public void OnReturnedToCenter() { // txtX.setText("stopped"); joyx=0; joyy=0; //txtY.setText("stopped"); }; }; @Override public boolean onCreateOptionsMenu(Menu menu) { // Inflate the menu; this adds items to the action bar if it is present. getMenuInflater().inflate(R.menu.main, menu); return true; } @Override public boolean onOptionsItemSelected(MenuItem item) { // Handle item selection switch (item.getItemId()) { case R.id.action_settings: //setContentView(R.layout.activity_options); final Dialog dialog = new Dialog(context); dialog.setContentView(R.layout.activity_options); dialog.setTitle("Options"); RadioButton radmap = (RadioButton) findViewById(R.id.radioButton); RadioButton radcam = (RadioButton) findViewById(R.id.radioButton2); EditText server = (EditText) findViewById(R.id.editText); EditText cmdport = (EditText) findViewById(R.id.editText2); EditText imgport = (EditText) findViewById(R.id.editText3); Button LLButton = (Button) findViewById(R.id.button); Button SButton = (Button) findViewById(R.id.button2); Button CButton = (Button) findViewById(R.id.button3); CButton.setOnClickListener(new Button.OnClickListener(){ @Override public void onClick(View v) { dialog.dismiss(); } }); Button ConButton = (Button) findViewById(R.id.button4); Button DisButton = (Button) findViewById(R.id.button5); // set the custom dialog components - text, image and button dialog.show(); return true; } return false; } }Thank you very much. Me too searching for it.
Hi mkYong, First of all congratulations for your demos, are so useful.
I’m new on the android world and i have a problem, i’m trying to show a dialog when i choose a concrete option in my spinner, but when i do this, my application crashes and stops the program.
The code is something like this:
public void onItemSelected(final AdapterView parent, View view, int pos,long id) {
String addSM = parent.getItemAtPosition(pos).toString();
if (addSM == “A?adir”){
// custom dialog
final Dialog dialog = new Dialog(controlador.context);
dialog.setContentView(R.layout.dialog_afegirsuper);
dialog.setTitle(“Title…”);
// set the custom dialog components – text, image and button
TextView text = (TextView) dialog.findViewById(R.id.text);
text.setText(“Android custom dialog example!”);
Button dialogButton = (Button) dialog.findViewById(R.id.dialogButtonOK);
// if button is clicked, close the custom dialog
dialogButton.setOnClickListener(new OnClickListener() {
@Override
public void onClick(View v) {
dialog.dismiss();
}
});
dialog.show();
}
}
thanks a lot for any solution.
When you compare strings, you must do it like this:
if(addSM.equals(“Añadir”))
The way you are doing it is wrong. Try this change and then make a reply if everything is going well.
Regards
@Ricardo A.Hermosilla Carrillo
Yes, you said right. Better way is using if(“Añadir”.equals(addSM)) this will
prevent the case addSM is null too.
please any one help me I want to create one popup dialog after clicking one button,So in that dialog box I need one Title bar,in the down i want 3 messages has to display ,1) will change based on the requ 2) constant 3) *T&C APPLY that is also constant. These 3 messages should be different sizes
I recommend you not to work with spanish-symbols and/or non-english-symbols, it can give some problems if not configured properly.
“Anadir” rather “Añadir” 🙂
//////
Te recomiento no trabajar con símbolos en español y/o en otro idioma distinto del inglés, a veces puede traer algunos problemas si no es configurado apropiadamente.
es mejor “Anadir” en vez de “Añadir”
Thanx Very Much Sir..
It Helped Me A Lot…
Thanx Very Very Much Again..
😀
Very useful example. I tried to do a simpler example myself and initially I wrote it like this:
public class MainActivity extends Activity {
Context mContext = null;
Dialog dialog = null;
@Override
protected void onCreate(Bundle savedInstanceState) {
super.onCreate(savedInstanceState);
setContentView(R.layout.activity_main);
mContext = getApplicationContext();
dialog = new Dialog(mContext);
dialog.setContentView(R.layout.custom_dialog);
dialog.setTitle(“Custom Dialog”);
TextView text = (TextView) dialog.findViewById(R.id.text);
text.setText(“Hello, this is a custom dialog!”);
ImageView image = (ImageView) dialog.findViewById(R.id.image);
image.setImageResource(R.drawable.ic_launcher);
dialog.show();
}
}
The result was that the application crashed right after launching. Then I compared it to your example and I saw that the assignment
Context mContext = null;
should be instead
Context mContext = this;
and also the assignment to mContext inside the method becomes no longer necessary. I would be very grateful if someone could explain why is this so. It seems reasonable, though I can’t grasp the full meaning.
Thank you, mkyong!!
To remove the dialog’s title,
dialog.requestWindowFeature(Window.FEATURE_NO_TITLE);
before you set the layout (with dialog.setContentView(R.layout.education_details_layout);)
It crash my app in Samsung Galaxy Tab 10.1 with Android 3.2
Thanks for the tip! 😀
please any one help me I want to create one popup dialog after clicking one button,So in that dialog box I need one Title bar,in the down i want 3 messages has to display ,1) will change based on the requ 2) constant 3) *T&C APPLY that is also constant. These 3 messages should be different sizes
Thank you, worked like a charm
Great post! Thank you. I compiled a list of some top resources for creating a custom dialog box in android. I included your post. Check it out/ feel free to share. http://www.verious.com/board/Giancarlo-Leonio/customizing-dialog-boxes-in-android/ Hope this can be useful to other developers too. 🙂
Nice tutorial. I have a question. Question is what if I want to return some value to activity from this dialog. Here is my example.
Activity layout file : activity_my_dialog.xml
<LinearLayout xmlns:android="http://schemas.android.com/apk/res/android"
    xmlns:tools="http://schemas.android.com/tools"
    android:layout_width="match_parent"
    android:layout_height="match_parent"
    android:orientation="vertical"
    tools:context=".MyDialogActivity" >

    <Button
        android:layout_width="wrap_content"
        android:layout_height="wrap_content"
        android:text="Click to Add Details"
        android:id="@+id/btn"/>

    <EditText
        android:layout_width="fill_parent"
        android:layout_height="fill_parent"
        android:id="@+id/etd"
        />
</LinearLayout>
Dialog Layout File : education_details_layout.xml
<?xml version="1.0" encoding="utf-8"?>
<LinearLayout xmlns:android="http://schemas.android.com/apk/res/android"
    android:layout_width="wrap_content"
    android:layout_height="wrap_content"
    android:orientation="vertical" >

	<TextView
	    android:layout_width="fill_parent"
	    android:layout_height="wrap_content"
	    android:text="Name"
	    />
	<EditText
	    android:layout_width="fill_parent"
	    android:layout_height="wrap_content"
	    android:id="@+id/ednm"
	    />

	<TextView
	    android:layout_width="fill_parent"
	    android:layout_height="wrap_content"
	    android:text="City"
	    />
	<EditText
	    android:layout_width="fill_parent"
	    android:layout_height="wrap_content"
	    android:id="@+id/edcity"
	    />
	<TextView
	    android:layout_width="fill_parent"
	    android:layout_height="wrap_content"
	    android:text="Highest Qualification"
	    />
	<EditText
	    android:layout_width="fill_parent"
	    android:layout_height="wrap_content"
	    android:id="@+id/edq"
	    />

	<LinearLayout
	    android:layout_width="fill_parent"
	    android:layout_height="wrap_content"
	    android:orientation="horizontal"
	    >
	<Button
	    android:layout_width="wrap_content"
	    android:layout_height="wrap_content"
	    android:text="Add"
	    android:id="@+id/btnadd"
	    />
	<Button
	    android:layout_width="wrap_content"
	    android:layout_height="wrap_content"
	    android:text="Cancel"
	    android:id="@+id/btncancel"
	    />
	</LinearLayout>
</LinearLayout>
Creating custom dialog : Mydialog.java
package com.myclass.mydialog;

import android.app.Dialog;
import android.content.Context;
import android.os.Bundle;
import android.view.LayoutInflater;
import android.view.View;
import android.widget.Button;
import android.widget.EditText;

public class Mydialog extends Dialog implements android.view.View.OnClickListener{
	Context context;
	Button btnadd, btncancel;
	EditText etnm, etncity, etnq;
	String result;
	public Mydialog(Context context) {
		super(context);
		this.context = context;
	}

	@Override
	protected void onCreate(Bundle savedInstanceState) {
		// TODO Auto-generated method stub
		super.onCreate(savedInstanceState);
		setContentView(R.layout.education_details_layout);
		btnadd = (Button) findViewById(R.id.btnadd);
		btncancel = (Button) findViewById(R.id.btncancel);

		etnm = (EditText) findViewById(R.id.ednm);
		etncity = (EditText) findViewById(R.id.edcity);
		etnq = (EditText) findViewById(R.id.edq);
		result = "";

		btnadd.setOnClickListener(this);
	}

	public String showMyDialog()
	{
		show();
		return result;
	}
	@Override
	public void onClick(View v) {
		// TODO Auto-generated method stub
		if(v == btnadd)
		{
			result = etnm.getText().toString()+" - "+etncity.getText().toString()+" - "+etnq.getText().toString();
			hide();
		}
		else
		if(v == btncancel)
		{
			result = "";
			dismiss();
		}
	}

}
Main Java File : MyDialogActivity.java
package com.myclass.mydialog;

import android.os.Bundle;
import android.app.Activity;
import android.app.Dialog;
import android.view.Menu;
import android.view.View;
import android.view.View.OnClickListener;
import android.widget.Button;
import android.widget.EditText;
import android.widget.Toast;

public class MyDialogActivity extends Activity implements OnClickListener {
	Button btn;
	EditText et;
	Mydialog d;
	@Override
	protected void onCreate(Bundle savedInstanceState) {
		super.onCreate(savedInstanceState);
		setContentView(R.layout.activity_my_dialog);
		btn = (Button) findViewById(R.id.btn);
		et = (EditText) findViewById(R.id.etd);
		d = new Mydialog(this);

		btn.setOnClickListener(this);

	}

	@Override
	public boolean onCreateOptionsMenu(Menu menu) {
		// Inflate the menu; this adds items to the action bar if it is present.
		getMenuInflater().inflate(R.menu.activity_my_dialog, menu);
		return true;
	}

	@Override
	public void onClick(View v) {
		// TODO Auto-generated method stub
		if(v == btn)
		{
			d.show();
			String result = d.result;

			if(result.equals(""))
			{
				Toast.makeText(getBaseContext(), "Action cancelled", Toast.LENGTH_LONG).show();
			}
			else
			{
				et.append("\n"+result);
			}
		}
	}
}
What ever details I am accepting from dialog box needs to be appended in the EditText component in main activity.
Please help me. Thanks in advance.
I got the answer myself. Answer is to add OnDismissListener() to dialog as below:
MyDialogActivity.java
package com.myclass.mydialog; import android.os.Bundle; import android.app.Activity; import android.app.Dialog; import android.content.DialogInterface; import android.content.DialogInterface.OnDismissListener; import android.view.Menu; import android.view.View; import android.view.View.OnClickListener; import android.widget.Button; import android.widget.EditText; import android.widget.Toast; public class MyDialogActivity extends Activity implements OnClickListener { Button btn; EditText et; Mydialog d; @Override protected void onCreate(Bundle savedInstanceState) { super.onCreate(savedInstanceState); setContentView(R.layout.activity_my_dialog); btn = (Button) findViewById(R.id.btn); et = (EditText) findViewById(R.id.etd); d = new Mydialog(this); btn.setOnClickListener(this); d.setOnDismissListener(new OnDismissListener() { @Override public void onDismiss(DialogInterface dialog) { // TODO Auto-generated method stub String result = d.getResult(); if(result.equals("")) { Toast.makeText(getBaseContext(), "Action cancelled", Toast.LENGTH_LONG).show(); } else { et.append("\n"+result); } } }); } @Override public boolean onCreateOptionsMenu(Menu menu) { // Inflate the menu; this adds items to the action bar if it is present. getMenuInflater().inflate(R.menu.activity_my_dialog, menu); return true; } @Override public void onClick(View v) { // TODO Auto-generated method stub if(v == btn) { d.show(); } } }very nice example…
very useful!
thank you!
It will cause the black background,like the http://stackoverflow.com/questions/8117849/remove-black-background-of-custom-dialog?answertab=votes#tab-top
and there have a solution.
Great Tutorial..Worked well….thanks
This is Very easy Tutorial for Beginners Like Me……Thank you very much…….
it don’t run in Android 3.0 (API 11)
oh, I sr ! it work well 🙂
My own-dialog created from this example is working well in Samsung Galaxy Tab 10.1 with Android 3.2
that was really nice example for beginners. thank you very much.
Perfect, straight to the point!
Hi, mkYong
The section
dialogButton.setOnClickListener(new OnClickListener() {
@Override
public void onClick(View v) {
dialog.dismiss();
}
});
crashed on my app.
But not on your sample code.
What could happened?
Thanks
have you import this? 🙂
Thank you very much for the post! Just I’m searching for it.
hi thanks a lot….but by using this code,my dialog box is dismissed without clicking ok button .If i click anywhere on window it will be closed …can u tell me the reason???thank u…..
Can you provide any simple example of zoom in,zoom out…in android?
Your website is good examples for beginner.. keep it up..
Thanks very much. With this tutorial I have understood which one was the error made lost me many hours.
Thanksssssss.
Hi could you please tell me how can I add this into my existing application. I understand how to add the xml layout files, but not sure where to add the .java file. Is it under the src folder ? I tried adding your two xml files and the .java file to my app but when I launch the app nothing appears. not even an error message
Hi,
look this: http://stackoverflow.com/questions/5821749/android-crash-in-dialog-show
final Dialog dialog = new Dialog(MainActivity.this);
Viktor
Hi could you please tell me how can I add this into my existing application. I understand how to add the xml layout files, but not sure where to add the .java file. Is it under the src folder ? I tried adding your two xml files and the .java file to my app but when I launch the app nothing appears